Monday, December 30, 2013

Pre-populate Desktop Director domain field

I have wrote this article way back for DD version 2.x. With XD 7.1  desktop director has interface has been changed. To prepopulate domain field like

image 

we have to make changes in LogOn.aspx file and replace “RoyDomainNetBiosName” .

image

IIS reset is a must post this change

Friday, December 13, 2013

3 steps to enable Auditing on Citrix Provisioning Server

We need to find out the way to track changes made on PVS server or datastore. For that first enable this auditing at farm level

image

Then check for the changes made by selecting Audit trail. This can be checked at every level.

image

Now you can see all the changes which are made.

image

Monday, December 2, 2013

Cannot connect to hypervisor at : No Active hosts found

We were trying to provision XD via PVS 7.1 . Host connection were configured for ESX 5.o update 2. While running XD setup wizard , it was able to establish connection with VC

image

But it was not able to get the VM template

image 

Upon reviewing VC we found that there were few datacenter without any host added to it. We gave XD service account exclusive rights on only respective DC and that way I was able to complete setup wizard.

Source

Wednesday, November 27, 2013

How to present home drive and set Quota for Citrix provisioned desktop

When we use roaming profile we follow best practice suggested by Microsoft for roaming profile which is listed here. This redirected folder is presented as home drive to the end users. So say suppose company has a guideline to limit users home drive , then in that case we must limit this using quota.

We recommend to use different shares for home drive and profiles so that it would be easy to redirect everything and set quota. I usually present redirect folder as users home drive. This is achieve via GPO

image 

So when user login he will see his home drive like this

image

To achieve this we decided to use windows 2012 and take benefits of SMB3 . I am not going to explain how to setup DFS here. There are tons of article on the net. What I am going to explain here is how we can setup desire quota for each users.

Windows 2012 have two console for quota setting

image

And other via FSRM

image

For quota setting we need to use FSRM . So lets start using FSRM and define hard quota for 5GB. We need to create custom template with Hard quota. Soft quota does trigger alert and all but hard quota does not.

image

Once template is ready go to the quota section and select create quota

image

Path to quota will be root where I will be storing all the users data . In my case share path name is data which is mention above. Make sure you select “Auto apply template and create quotas on existing and new subfolders”. Here under drop down you will see custom quota created earlier. After applying create , don’t forget to exist and report FSRM. I had challenge  because I was trying to refresh using FSRM. Once quota is set this is how it will looks like

image

Here you can modify quota for individual users

image

So what permission do I need?

Make sure share has following permission set on the shares

image

And this permission is in place

image

Make sure you enable access based enumeration to prevent users from seeing or accessing others folder

image

This will allow user to see home drive with quota along with  respective permission.

Tata Bye bye till next time

Friday, November 8, 2013

XD 7.1 : MCS error “Provisioning scheme not recognized” with VMWare

I was trying to create MCS catalog using virtual center 5.0 U1 and it was throwing error 

image

While looking at catalog provisioning scheme name was empty

image

While looking at active task it was erroring out after 29%.

image

We looked deeper into error message and it was “Error Id: XDDS:4E970E49”

image

This was the case where virtual and ESX were connected via WAN link with 200ms + of latency . Finally we increase timeout value for VMWare connection  from default to 8 hours and that worked. I am not going to explain details here but if you want to know more trying using wireshark.

image

Friday, September 6, 2013

Configure HP T410 for Citrix AGEE via using Native client

First we need to ensure that all the require certificate which is configured on AGEE SSL is copied over HP T410. To do that we need to enter admin mode

image

Once admin mode is enabled ( It will ask for password and default is root) you can find the option called certificates

image 

Insert the pen drive with require certificate and then import using certificate manager

image 

Once done then create connection using connection manager

image

This connection uses legacy client setting on store front.  So check store front setting for this

image image

Once this setting is supplied it will prompt for user name password. This user name can be in form of domainname\user and then just the password

image

Once user name is accepted , then you will get desktop with all the icon

image

Tuesday, August 20, 2013

XenApp session throwing error "To log on to this remote computer, you must be granted"

When XenApp hosted shared desktop is launch or XenApp published applications are launch it throw following error " To log on to this remote computer , you must be granted the allow log on through Terminal Services right"

image

Users were member of local desktop groups but for some reason local policies for "Allow log on through Remote Desktop Services" were not configured for "Remote Desktop users" Once added , HSD were successfully launched. image

Thursday, August 15, 2013

How to integrate App -V with XenApp 6.5 -About Roy Approach

Though there are tons CTX and KB published but I would like to have my own reference based on my own experience.  All I need is XenApp and application will be streamed to the XA server rather to the client.So how do we start with. First we should download App -V integration kit from Citrix site. This site is listed under

image

Once downloaded extract it and you can find following files under it.

image

Copy this folder under App V hub. Now this App V hub is noting but where captured applications are kept and location is following

image  

Next thing we need to do is install App-V client on the machine where application is intended to be streamed. In my case application will be streamed to the XenApp box. Remember App -V client for XenApp is different and you need to download App-V client for  remote desktops services 

image

After installing App-V client on XenApp box which will be used to published this app, we must insure some settings are populated. During installation we can install with default settings like locations for app hub. Rest all settings can be populated latter

image 

Specifying publishing server is a must.

image

And yes do not forget to update the following registry setting on all the XenApp box which will be used for App-V streaming

image

So this all settings are on App -V client which is installed on XenApp box. Same XenApp box will be used for streaming App -V applications.

Now we need to provide permissions on Applications as well. Make sure application which we are intended to be publish have XenApp users mapped.

image

Now we will be publishing this applications via XenApp. I am not going to cover each steps.While publishing apps I am choosing stream to server because I will be using my XA box to stream App -V OSD (Application streaming)

image

Now I will be selecting locations for applications. So profile address will be pointing  App -V conduit which is from App -V integration kit. This will populate profile field. Then we need to type UNC path for application OSD. This is post application has been sequenced via App -V . To sequence App -V follow CTX126082

image

While selecting servers choose the server where we have installed App -V client which is mention in the beginning. Add the users and then we can see the application via SF portal

image  

You can observe that here it launch from Q drive

image

Also on if you notice client status on XenApp server it will be 100% stream

image

Rest all will leave to you guys to figure out as I am no expert with App -V . And yes feedback as always welcome.

Thursday, July 18, 2013

Applying windows 7 theme for XenApp 6.5 hosted desktop via GPO

While most of you know how to enable windows7 theme for Windows 2008R2 machine and incase you don't then please try CTX133429. But I always love GPO ways so this is my way :) .  Follow CTX133429  from steps 3 onwards. Now create a GPO as shown below

image

Place the files and folder under NETLOGON so that permission won't be issue :)

image

Once user's login they will get windows 7 theme without any issue and yes do not forget to enable loop back processing mode or else policy may not get applied.

Tuesday, July 16, 2013

Compare youtube video on virtual desktop (VDA 7.0) vs Physical Desktop

I just prepare video comparing youtube running on virtual desktop running windows 7 with Virtual desktop agent version 7.0 with that of Physical desktop. Virtual Desktop has 1 vCPU and 3 GB of memory.

Monday, July 15, 2013

Working with Hyper-V2008R2 and Citrix PVS - A perfect जुगलबंधी

Streaming virtual machine on Hyper -V host 2008R2 has its own challenge. No matters what you do , you have to make your PVS streamed multihomed ( Except BDM with Static IP)

image

BDM with static IP for some reason , I don't like it. So what is the reason and why we need multihomed PVS streamed virtual machine on Hyper-V host. Hyper -V do not support PXE on synthetic  adapter. If you try to boot VM via synthetic NIC you will get an error "Unable to find NIC, status code : 0x00860086"

clip_image002

So what is the issue with legacy NIC then ? If you choose legacy network throughput you will get is 100MB.

image

This is has been nicely explained  in one of the Hyper-V design document  from Citrix and I guess there is no reason why I should not copy paste it here :)

" Networking Considerations

Microsoft Hyper-V has two types of network adapters. The first is referred to as the “Legacy Network Adapter” in the Hyper-V management console and as the “Emulated Network Adapter” in the VMM Administrative console. The other adapter is referred to as the “Synthetic Network Adapter” in both consoles.

The legacy network adapter is tied directly to the BIOS of the virtual machine. Using the legacy adapter increases processor overhead because device access requires context switching for communication. The legacy network adapter is required for supporting any Pre-boot Execution Environment (PXE) such as that used with Provisioning Services. Contrary to popular belief, the legacy network is not limited in speed to 100MB, but it can run at speeds higher than 100MB if supported by the host’s physical network interface.

11Design Guide | XenDesktop and Microsoft Hyper-V

The synthetic network adapter is loaded by the Host Integration Services after the operating system loads inside the virtual machine. As such, the synthetic network adapter is not available for any PXE operations. Since the synthetic network adapter is integrated directly with the virtual machine, it can leverage the high-speed VMBus for communication and reduce processor overhead by avoiding the context switches that the legacy network adapter requires.

Single Network Adapter Configuration

If Provisioning Services or other third-party PXE imaging delivery applications will not be used in the environment, the legacy network adapter is not necessary. Best performance will be achieved by using a single synthetic adapter.

Conversely, if the processors are not taxed and can easily handle the additional context switches, the legacy network adapter could be the sole network adapter for virtual machine. The network throughput would be the same from the perspective of the virtual machine. The only impact might be on the number of the guest virtual machines supported by a single physical Hyper-V host.

A single network adapter is recommended for simplicity if network performance or fault-tolerance is not a priority for the user environment. If NIC Teaming will not be configured for the adapters servicing the virtual network or if network performance is a key requirement, the dual network adapter approach is recommended

Dual Network Adapter Configuration

With Hyper-V the legacy network card (NIC) is required for supporting PXE with Provisioning Services. After the virtual machine boots, the synthetic NIC has precedence over the legacy network card since the driver sets the route metric for the synthetic NIC to be lower than the legacy NIC.

If using Provisioning Services to deliver the operating system, be sure to run bindcfg from the Provisioning Services installation folder to verify the legacy network adapter is bound to the Provisioning Services device driver before creating a vDisk image. If the Provisioning Services device driver binds to the wrong network adapter, the image will not be able to complete the boot process. More information on using bindcfg can be found in the Appendix.

If using Provisioning Services to stream the operating system, the best performance is achieved by creating two network cards for each virtual machine. The legacy network card will be used to support the PXE booting and all PVS traffic and the synthetic network card will be used for all other network traffic once the operating system has started. If both network cards are enabled in the operating system and on the same subnet, the synthetic card should have preference for all non-PVS traffic. The PVS traffic will always traverse the legacy network card because it is bound to that card. In some situations the legacy network adapter might also be used to transmit data since Windows Networking uses multiple factors to determine the best route for a packet. "

So now it is clear why we need multi-homed PVS streamed target device. So how should we go about designing?

1)  Should we have both NIC on same VLAN ?

2) Should we dedicate VLAN for streaming traffic ?

3) What will happen when this streaming VLAN is exhausted ?

4) Is it OK to have dual gateway on same VM?

Most of the network engineer will not like idea of having dual gateway on same VM. There may be some security concern since same PVS will be used for multiple use case scenario. What is the way around then ?

Layer 2 VLAN : Layer 2 VLAN does not have gateway ( Sorry about my limited exposure to networking) . Hence boot VM using Layer 2 VALN then when OS is loaded use synthetic NIC data traffic.

image

Sounds like a plan ?

To start with

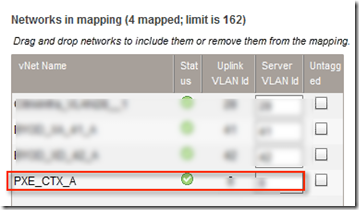
a) make sure you ask network folks to create layer 2 VLAN with big subnet  and  Trunk  this VLAN on PVS server as well as on Hyper-V host. I am using HP blade hence I use same SUS ( Shared uplink set on HP virutal connect) for even PXE traffic.

image

This is trunk set on Hyper -V host but for PVS server we are dedicating NIC and then teaming it.

image

I am not going to discuss steps for creating VLAN on Hyper -V host. Hope you have read my other post 1 and post 2 

b) You will need one DHCP server in same VLAN. For this I have used VM with two NIC one pointing to Layer 2 VLAN and other pointing to Layer 3 or regular VLAN so that I can perform my management. This VM can exist with other infra component or you can use different physical machine or virtual machine from separate environment . Also while installing DHCP server bind service to Layer 2 VLAN

image

Very important : Make sure DHCP is authorized or else PXE client will not get an IP address.  Also just add 66 and 67 option poinit

Make sure you are able to communicate between PVS and DHCP server. Run config wizard on PVS server and select Layer 2 VLAN as PXE VALN

image

Configure targets and templates to point first NIC on PXE vlan and next NIC on regular VLAN

image

Before you capture targets set the NIC boot order ( Press Alt under Network connection to get advance options)

image

So when VM's are booted you will connect to PVS over non gateway VLAN

image

Enjoy and don't forget to post comment if any